Xedant Code uses two kinds of environment variables that serve different purposes:
- App-level variables — configure Xedant Code itself (login credentials, project path, license, API keys for authentication). These are set before the application starts — via system environment variables, CLI arguments, or
.envfiles — and cannot be changed through the Environments page. - Claude Code-level variables — configure the AI model and are managed entirely through the Environments page. Each environment is a named set of variables (API keys, model names, base URLs, pricing) that gets passed to the Claude Code CLI process. You can create multiple environments and switch between them at any time.
App-Level Environment Variables
These variables configure Xedant Code itself and must be set before the application starts. They cannot be managed through the Environments page — use system environment variables, CLI arguments (KEY=VALUE), or an .env file (loaded via --env filename).
Core Settings
XEDANT_CODE_LOGIN— Login username. Auto-generated ascodeif not set.XEDANT_CODE_PASSWORD— Password as SHA256 hash. Auto-generated if not set and output to console (temporary until restart). You can generate the hash using the built-in SHA256 generator on the login page — click the “▸ SHA256 generator” link below the Sign In button.XEDANT_CODE_PROJECT_PATH— Path to the project directory. Required for manual and Docker installs. The folder can be empty or non-existent — in that case the app automatically checks out the project from the configured Git URL.XEDANT_CODE_LICENSE— License key. A trial license is used if not set.XEDANT_CODE_API_KEY— SHA256 hash of the API key for the remote API. Disabled if not set.XEDANT_CODE_DATABASE— Custom database path or PostgreSQL connection string. Defaults to.xedant/project.db(SQLite), stored relative to the project folder so you can commit it to the repo. For production use, a PostgreSQL database is recommended — it’s faster and more reliable than SQLite.JWT_SECRET_KEY— Custom JWT signing key (min 32 characters). Auto-generated if not set. This key must not be easily guessable — anyone who knows it can generate valid authentication tokens. If you don’t provide your own key, it gets re-generated on Docker container recreation, requiring all users to re-login.XEDANT_CODE_CLICKHOUSE_URL— ClickHouse connection string for pushing chat stats to a centralized store for visualization and monitoring. Enables building Grafana dashboards or custom charts on your productivity across all projects at once, rather than viewing each project in isolation. Example:Host=172.17.0.1;Port=8127;Protocol=http;Database=;Username=;Password=
Git Integration
XEDANT_CODE_PROJECT_GIT_URL— Git URL for cloning the project repository. Defaults to the demo project repo.XEDANT_CODE_PROJECT_GIT_LOGIN— Git login for the project repository.XEDANT_CODE_PROJECT_GIT_PASSWORD— Git password for the project repository.XEDANT_CODE_SKILLS_GIT_URL— Git URL for cloning the skills repository. Defaults to the demo skills repo.XEDANT_CODE_SKILLS_GIT_LOGIN— Git login for the skills repository.XEDANT_CODE_SKILLS_GIT_PASSWORD— Git password for the skills repository.XEDANT_CODE_GIT_USER_NAME— Git user name used for commits.XEDANT_CODE_GIT_USER_EMAIL— Git user email used for commits.
Miscellaneous
XEDANT_CODE_CLAUDE_PATH— Custom path to the Claude Code CLI executable.XEDANT_CODE_ICON_PATH— Path to a custom icon displayed in the UI.DISABLE_AUTOUPDATER— Set to1to disable the Claude Code auto-updater (commonly used in Docker).DOTNET_ROOT— Path to the .NET runtime (used by the build system).DEV_BASE_PATH— Base path for dev proxy configuration.
Claude Code-Level Variables
These variables configure the AI model and are managed through the Environments page. They are stored in .xedant/environments.yml and passed directly to the Claude Code CLI process when a chat session starts. Environment variables override system variables, and system variables serve as fallback.
Authentication & API
ANTHROPIC_API_KEY— Anthropic API key. Used by Anthropic’s direct API.ANTHROPIC_AUTH_TOKEN— Auth token for third-party providers (z.ai, OpenRouter, xAI, MiniMax, Kimi). Alternative toANTHROPIC_API_KEY.ANTHROPIC_BASE_URL— API base URL. Defaults to Anthropic’s endpoint; override for third-party providers.MAX_MCP_OUTPUT_TOKENS— Maximum tokens for MCP server output. Default:100000.
Model Configuration
ANTHROPIC_MODEL— Primary model name used for chat responses.ANTHROPIC_DEFAULT_OPUS_MODEL— Model used for complex sub-tasks requiring the highest capability.ANTHROPIC_DEFAULT_SONNET_MODEL— Model used for balanced sub-tasks (speed vs. intelligence).ANTHROPIC_DEFAULT_HAIKU_MODEL— Model used for fast, lightweight sub-tasks.CLAUDE_CODE_SUBAGENT_MODEL— Model used for Claude Code subagent operations (forked agents).MODEL_CONTEXT_LENGTH— Context window size in tokens. Used for cost calculations and display.
Pricing (per million tokens)
MODEL_INPUT_PRICE— Input token price.MODEL_OUTPUT_PRICE— Output token price.MODEL_CACHE_READ_PRICE— Cache read token price.MODEL_CACHE_WRITE_PRICE— Cache write token price.
Behavior Control
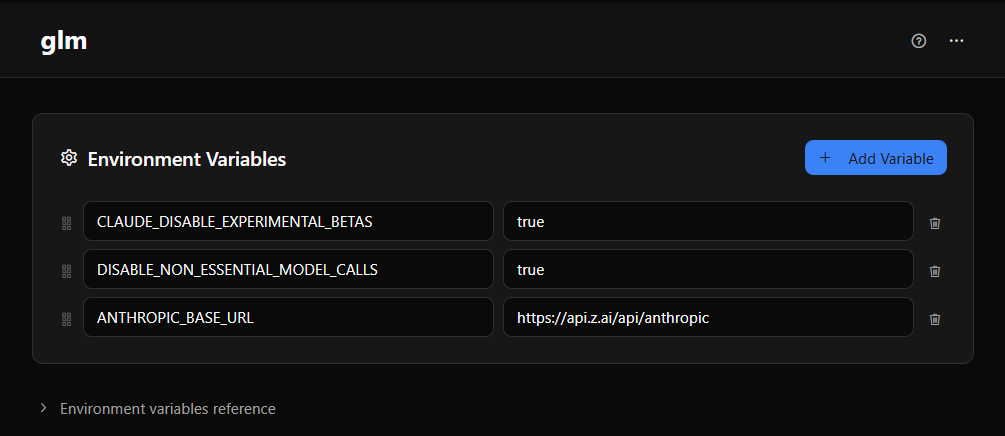
CLAUDE_DISABLE_EXPERIMENTAL_BETAS— Set totrueto disable experimental beta features (recommended for third-party providers).DISABLE_NON_ESSENTIAL_MODEL_CALLS— Set totrueto disable non-essential model API calls (recommended for third-party providers).ENABLE_TOOL_SEARCH— Set tofalseto disable tool search (used by some providers that don’t support it).
Note: When creating an environment from a built-in provider (Anthropic, z.ai, OpenRouter, etc.), most variables are pre-configured automatically. You only need to supply your API key — the provider template fills in the model names, base URL, pricing, and behavior flags. See Setting Up Your First Environment in the Getting Started guide.
What Are Environments?
An environment is a named collection of Claude Code-level variables that the AI uses when responding to your messages. Instead of hard-coding a single API key or model name, you can create multiple environments and switch between them on the fly.
For example, you might create:
- Claude — configured with Anthropic’s API key and a Claude model
- GPT-4 — configured with OpenRouter’s API key and GPT-4
- GLM — configured with z.ai’s API key and a GLM model
- Testing — a cheaper or faster model for experimentation
Each environment has its own set of variables. When you switch environments, the AI immediately starts using the new configuration for all subsequent messages.
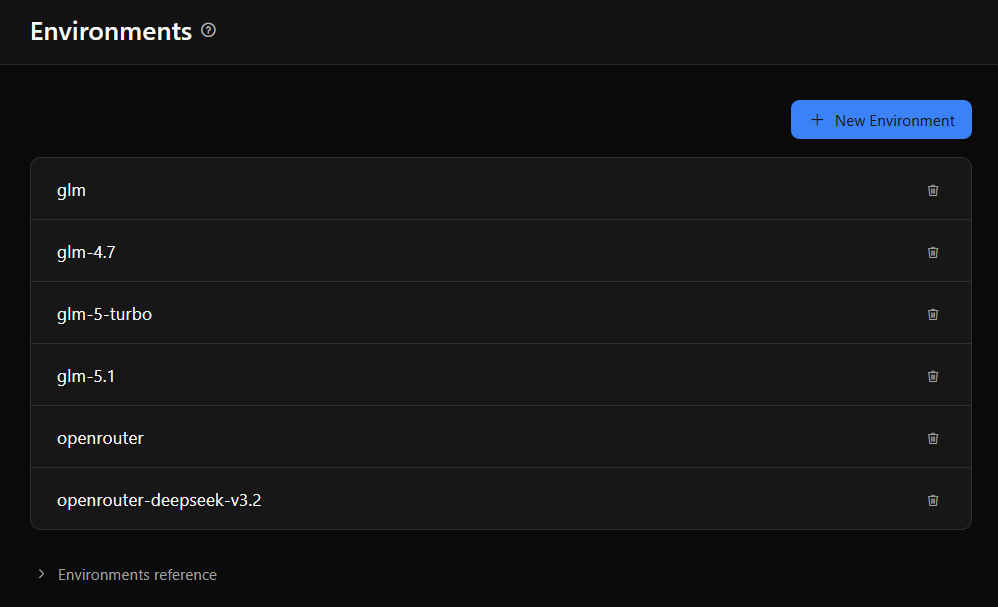
Hierarchical inheritance: Environment names support inheritance based on hyphen-separated segments. For example, an environment named glm-5-turbo automatically inherits variables from both glm-5 and glm. This lets you define shared settings (like API key and base URL) in a parent environment and override only what differs in child environments (like model name or pricing). Child variables always take precedence over parent variables.
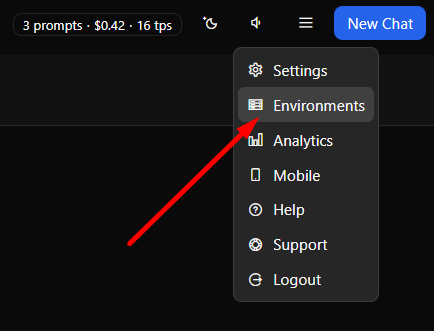
Viewing Environments
Navigate to Environments from the main menu. The environments page lists all your configured environments, each showing its name and key variables at a glance. Click any environment to open its detail page where you can view and edit all variables.
Environment Detail Page
When you click an environment, its detail page opens showing all variables as key-value pairs. This is where you configure and fine-tune each environment.
Editing a variable: Click the value field and type the new value. Changes are saved automatically after a short delay — there’s no save button to press.
Adding a variable: Click “Add Variable” to create a new key-value pair. Enter the variable name and its value.
Adding a reference variable: Click “Add Reference Variable” to create a variable whose value references another variable. This is useful for keeping your configuration organized (see Variable Substitution below).
Reordering variables: Drag and drop variables up or down to arrange them in your preferred order. This is purely organizational — it doesn’t affect how the variables work.
Context menu: Right-click a variable for additional options such as editing, deleting, or copying.
Variable Substitution
Variables can reference other variables using the $VARIABLE_NAME syntax. When the environment is used, references are automatically resolved to their actual values.
For example, you might set up your variables like this:
API_KEY=sk-abc123...(your actual API key)BASE_URL=https://api.example.comFULL_ENDPOINT=$BASE_URL/v1/chat(references BASE_URL)
This approach keeps your configuration clean and maintainable. Change the base URL once, and every variable that references it updates automatically. Set your API key in one place and reference it throughout your configuration.
Safety tip: The $VARIABLE_NAME syntax also works with system environment variables. This means you can provide sensitive values (API keys, license keys, passwords) through Docker environment variables, system environment variables, or CLI arguments, and reference them in environments.yml without committing any secrets to the repository:
# .xedant/environments.yml — safe to commit
environments:
  production:
    variables:
      - ANTHROPIC_API_KEY=$MY_API_KEY          # resolved from system env at runtime
      - ANTHROPIC_AUTH_TOKEN=$MY_AUTH_TOKEN     # not committed to git
      - ANTHROPIC_BASE_URL=https://api.anthropic.com  # non-sensitive, fine to commit
This way the actual secret values stay in your Docker configuration (compose file, .env file, or -e flags) while environments.yml remains safe to commit and share.
Creating a New Environment
To create a new environment:
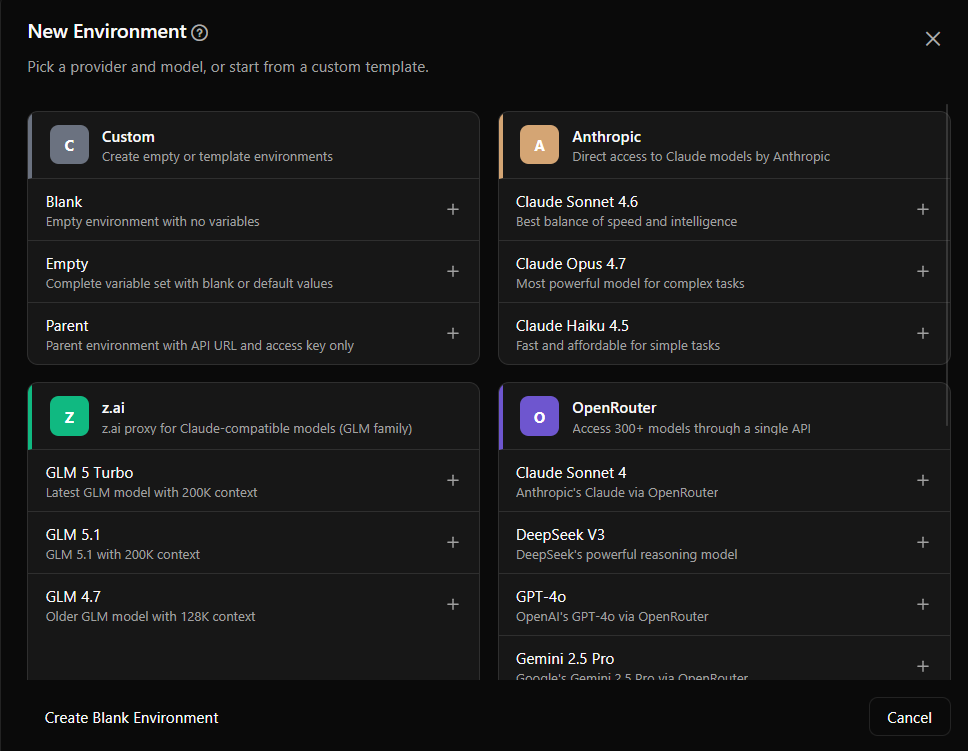
- Navigate to the Environments page from the main menu
- Click “New Environment” or use the context menu
- Enter a name for the environment (for example: “Claude” or “GPT-4”)
- Add the required variables for your AI provider (typically API key, model name, and base URL)
- Add any additional variables your project needs
- The environment is ready to use — switch to it from the chat input
Renaming an Environment
Click the environment name on the environments page to open the name editor. Type the new name and confirm. The rename applies everywhere the environment is referenced, including the chat input selector.
Switching Environments in Chat
The fastest way to switch environments is directly from the chat input area:
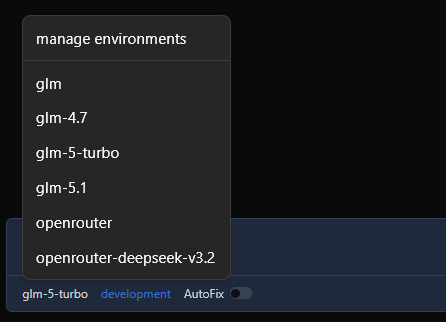
- Find the environment selector dropdown near the chat input
- Click it to see the list of available environments
- Select the environment you want to use
- All subsequent messages will use the selected environment’s configuration
Switching is instant — you don’t need to start a new chat session or refresh the page. The AI will begin using the new model and settings immediately for your next message. See the Chat section for more details on the chat input area.