What Is the .xedant Folder?
The .xedant/ folder is the configuration and data directory for Xedant Agent. It is created automatically in the root of your project the first time Xedant Agent runs, and it stores everything the application needs: build definitions, deployment settings, model presets, database files, run logs, and more.
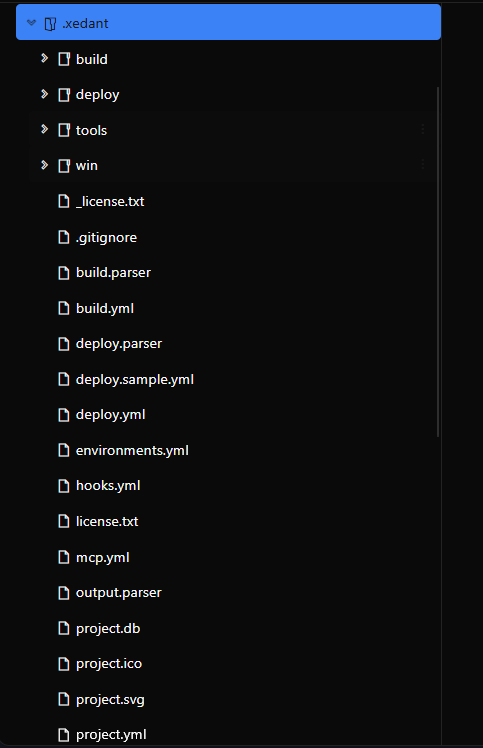
You will rarely need to edit these files yourself. The AI model reads .xedant/README.md to understand the format of every configuration file, so you can simply ask for changes — “add a build that runs my linter”, “set up a Docker deployment to staging”, “create a new model for GPT-4” — and the model will get the YAML syntax and file structure right.
This page explains what each file and folder does, so you know what is inside them and can make informed decisions when the AI proposes changes.
project.yml
This is your project’s “ID card”. It stores the project name, an optional icon, and an optional link that opens the project in the VS Code web editor.
project:
  name: "MyProject"           # Project name (auto-detected from git)
  icon: ".xedant/project.svg" # Path to project icon (optional)
  code: "https://..."         # VSCode Web URL (optional)
The name field is set automatically from your git remote on the first run, so you usually do not need to change it. The icon field can point to an .svg or .ico file. The code field is used when you want a button in the interface that opens your project directly in VS Code.
build.yml
This is where you define automatic build checks — commands that verify whether the AI changed the code correctly. Despite the name, a build does not have to compile anything. Any command that produces a readable result — errors and warnings — works: compilers, linters (tools that check code style and mistakes), type checkers, test runs, security scanners, or your own check scripts.
Builds come in two types:
- Command builds run a command and parse its output, looking for errors and warnings
- Prompt builds start a new chat with a review task — handy for code review and checks where the AI needs to “think”
build:
  compile:
    path: "server/"
    command: "dotnet build"
    delay: 3
    timeout: 60
    watch: "*.cs"
    ignore: []
    replacements: []
    stopStrings: []
    display: always
    autofix: always
    startSound: ""
    endSound: ""
    soundVolume: 1.0

  ai-review:
    watch: chat
    prompt: "/verify Review the recent code changes. Read the chat transcript at {chat} and report any problems."
    chatTitle: "Code Review"
    delay: 5
    timeout: 120
The key properties:
- command — The shell command to run (command builds only)
- prompt — The validation prompt sent to a new AI chat (prompt builds only)
- watch — File name patterns (
*.ts *.js), names of other builds (compile), orchatto run when a user chat completes - delay — Seconds to wait before starting after a change is detected (default: 3)
- timeout — Maximum run time in seconds (default: 60)
- display — When to show the build in the build panel:
always,errors,warnings, ornever - autofix — When to take part in AutoFix:
always,errors,warnings, ornever - ignore — Regex patterns to suppress from the error/warning output
- replacements — find/replace pairs for paths in the output (useful when a build runs in Docker or temporary directories)
- stopStrings — Strings that abort the build immediately when found in the output
- startSound / endSound / soundVolume — Optional audio feedback when a build starts or finishes
Builds can follow one another: one build watches another and starts only after it finishes successfully. This is how you chain checks — for example, compile → tests → deploy.
Output is saved in .xedant/build/ as three files per task: {name}.output.txt (full output), {name}.errors.txt (parsed errors), and {name}.warnings.txt (parsed warnings).
Learn more about builds, AutoFix, and the build panel →
deploy.yml
This file defines deployment targets — how your application gets started once the builds pass. It supports two methods: debug for local development and docker for remote container deployments.
# Local development — runs directly on your computer
deploy:
  my-app:
    method: "debug"
    path: "./server"
    command: "dotnet run"
    watch: "compile"        # Restarts after this build completes successfully
    shallowCopy: true        # Copy only changed files (faster)
    url: "https://..."        # Optional: clickable link in the interface
    startSound: ""
    endSound: ""

# Remote deployment — ships to a Docker container over SSH
deploy:
  production:
    method: "docker"
    host: "server.com"
    username: "deploy"
    sshKeyPath: "~/.ssh/key"
    imageName: "app:latest"
    containerName: "myapp"
    dockerfilePath: "./Dockerfile"
    environmentVariables:
      - PORT=3000
    portMappings:
      "8080": "3000"
The debug method runs the application right on your computer — convenient during development. It can watch builds and restart after a successful check, it copies only the files that changed (so restarts are faster), and it supports environment variables.
The docker method sends the code to a remote server over SSH, builds a Docker image, and manages the container — for staging and production. Port and volume (folder) mapping, Docker networks, health checks, and custom build arguments are all supported.
Output from the running application is saved to .xedant/deploy/{name}.log. Both methods support optional sound notifications (startSound, endSound, soundVolume).
Learn more about deployment controls, the deploy panel, and deployment methods →
models.yml
This file stores your AI model presets. Each model defines a set of variables that are applied when you select that model in the interface — for example, the model identifier, context length, and pricing.
models:
  claude-sonnet:
    variables:
      - ANTHROPIC_MODEL=claude-sonnet-4-20250514
      - MODEL_CONTEXT_LENGTH=200000
      - MODEL_INPUT_PRICE=3.0
      - MODEL_OUTPUT_PRICE=15.0

  claude-sonnet-fast:
    variables:
      - ANTHROPIC_MODEL=claude-sonnet-4-20250514
      - MODEL_CONTEXT_LENGTH=200000
      - MODEL_INPUT_PRICE=3.0
      - MODEL_OUTPUT_PRICE=15.0
Models support inheritance: a child model takes over all the variables of its parent. For example, if you have the models glm, glm-5, and glm-5-turbo, the turbo variant inherits settings from both, and you only need to set what differs at each level.
Values prefixed with $ refer to system environment variables: $MY_API_KEY will be replaced with the value of the MY_API_KEY environment variable from your system.
Learn more about creating and switching models →
mcp.yml
This is where you connect MCP servers — external tools that extend what the model can do: browsing web pages, querying databases, searching code, and more. (MCP stands for Model Context Protocol, a standard way to plug external tools into AI assistants.)
version: "1.0"
servers:
  filesystem:
    enabled: true
    type: "stdio"
    command: "npx"
    args:
      - "-y"
      - "@modelcontextprotocol/server-filesystem"
      - "/project"
    env:
      NODE_ENV: "production"
Each server connects in one of three ways:
- stdio — runs as a program on your computer
- http — connects to a remote server over the internet
- sse — connects through Server-Sent Events (the server itself sends updates)
This file syncs automatically with Claude Code’s own MCP configuration on startup and whenever changes are detected, so you can manage servers either from the Xedant Agent settings interface or directly in the Claude Code configuration — they stay in sync.
Learn more about adding and managing MCP servers →
hooks.yml
This file defines hooks — rules that intercept the AI’s actions before they run. Use them to block dangerous operations or to run your own commands at the right moments.
PreToolUse:
  Bash:
    - type: "deny"
      pattern: "rm -rf /"
      message: "Dangerous command blocked"
    - type: "execute"
      pattern: "git push"
      command: "echo 'Push detected'"
      regex: false
There are two hook event types:
- PreToolUse — fires before any AI action (a terminal command, a file edit, and so on). You can
deny(block) matching operations — with a message to the agent — orexecute(run) your own command when the pattern matches - UserPromptSubmit — fires when a prompt is submitted, letting you pre-process it
The hooks.yml file automatically generates .claude/settings.local.json — the actual hooks configuration that Claude Code reads. This means you only maintain hooks.yml, and the matching Claude Code settings file updates automatically.
Learn more about deny rules, execute commands, and tool-use control →
skills.yml
This file controls which skills are active in your project and what color each one shows in the interface. Skills are reusable sets of instructions that change how the AI behaves for specific tasks.
skills:
  version: "1.0"
  settings:
    skill-name:
      color: "#3b82f6"       # Hex color for UI display (default: "#888888")
Each skill entry sets an optional color used to display it in the interface; the file is edited in the skills dialog and synced back automatically. The list of keys also forms the set of activated skills offered by the /skill command in the Telegram bot.
Learn more about using, creating, and editing skills →
providers.yml
This file stores the AI provider definitions — pre-configured templates that describe how to connect to different AI services. Each provider defines connection fields (API keys, base URLs) and a set of models with pre-configured variables such as pricing and context length.
providers:
  - name: anthropic
    displayName: Anthropic
    description: Direct access to Claude models by Anthropic
    icon: anthropic
    color: "#D4A574"
    harnesses: [claude-code, opencode, pi]
    modelEnv: ANTHROPIC_MODEL
    fields:
      - name: apiKey
        label: API Key
        env: ANTHROPIC_API_KEY
        type: secret
        default: "$ANTHROPIC_API_KEY"
    models:
      - value: claude-sonnet-5
        label: Claude Sonnet 5
        description: Best balance of speed and intelligence
        sets:
          ANTHROPIC_MODEL: "claude-sonnet-5"
          MODEL_INPUT_PRICE: "2"
          MODEL_OUTPUT_PRICE: "10"
          MODEL_CONTEXT_LENGTH: "1000000"
This file is created automatically from a built-in resource when it is missing. It ships with pre-configured providers for popular services such as Anthropic, OpenRouter, and others. You rarely need to edit it by hand — the model wizard in the interface uses these definitions to set up a connection.
Parser Files
Three parser files pull errors and warnings out of the text output of programs. They all work the same way — a simple rule system with [ERROR] and [WARNING] blocks containing search patterns (regular expressions) inside. The files are thoroughly documented with comments inside, so you almost never need to edit them by hand.
How the Parsers Work
The parser walks the output lines and tries the patterns one by one:
- Comment lines starting with
#are ignored (they are used for documentation) - Single-line patterns — match one line of output
- Multi-line patterns — wrapped in
{{...}}, capture one or more consecutive lines (handy for detailed error reports or indented context)
# TypeScript compilation errors
[ERROR]
.*\.ts.*              # Matches a line containing a .ts file path
Error.*               # Matches a line starting with "Error"
{{^\s+}}              # Matches the indented context lines that follow
[/ERROR]
Parsers reload automatically when their files change — edits take effect immediately.
build.parser
Extracts errors and warnings from build command output. It already ships with patterns for C# (MsBuild, CSC), TypeScript, Svelte, Vite, Python (ruff), and ReSharper — add patterns for your project’s other tools as needed.
deploy.parser
Pulls errors and warnings from running application logs: unhandled exceptions, detailed error reports, database connection failures, HTTP errors, and crashes across different platforms.
output.parser
A general-purpose parser for plain script output: command-line errors, Python error reports, Node.js and npm failures, and other common formats. It is used when the output belongs neither to a build nor to a deployment.
license.txt
This file stores your application license key as a Base64-encoded JSON string. It has the highest priority of all license sources — it overrides both the --license command-line argument and the AGENT_LICENSE environment variable. If this file is present, its content is used regardless of any other configuration.
Learn more about license types, activation, and status →
project.db
This is the application database that stores all persistent Xedant Agent data — chats, messages, settings, analytics, and more. The default is SQLite, which keeps everything in a single file with no external database server required.
Three files may appear:
project.db— The main database fileproject.db-wal— the change journal: WAL mode speeds things up when reading and writing happen at the same timeproject.db-shm— a shared-memory helper file for WAL mode
The database is created on the first run, and its structure updates automatically when the program is updated — you never manage it by hand. You can use PostgreSQL instead of SQLite: set the AGENT_DATABASE environment variable to a connection string, and the database will be created there.
telegram.db
The database for the Telegram bot: it stores the mappings between Telegram chats and Xedant Agent chats, plus user settings (active chat, selected skill). It is created automatically when the bot is enabled; its data is not carried over into the main project database.
Three files may appear:
telegram.db— The main database filetelegram.db-wal— the change journaltelegram.db-shm— a shared-memory helper file for WAL mode
proxy.db
An SQLite database for the built-in proxy server — it stores the request log (headers, message texts, tokens spent, duration, errors) and the model’s reasoning cache. It is created automatically when the proxy is activated.
Three files may appear:
proxy.db— The main database fileproxy.db-wal— the change journalproxy.db-shm— a shared-memory helper file for WAL mode
Automatic cleanup: 30 days for request logs, 7 days for the reasoning cache. API keys and secrets are filtered out of the stored data automatically.
Directories
build/
Stores build output logs. Created automatically when builds run. Each build task produces three files: {name}.output.txt (full command output), {name}.errors.txt (parsed errors), and {name}.warnings.txt (parsed warnings). You can view them in the build panel without opening the files directly.
deploy/
Stores deployment runtime output and client debug logs. Created automatically when deployments run. Each deployment produces {name}.log with the application’s runtime output. Client debug logs are stored as {domain}.log (auto-truncated to 100 MB).
sounds/
An optional directory for custom notification sounds. Place .mp3 files here to override the built-in sounds or add new ones. The built-in sound names are message, notification, complete, error, commit, and deploy.
The server checks .xedant/sounds/ first, then falls back to the built-in defaults. To restore a built-in sound, simply delete your custom file. The startSound and endSound properties in build.yml and deploy.yml can reference any built-in sound name or a custom sound placed in this directory.
tools/
An optional directory for utility scripts. Put any helper scripts you want to use with your project here — diagnostic tools, deployment helpers, or custom automation. This directory is not created automatically.
Auto-created Files
The following files are created automatically on the first run if they do not exist. You can safely delete any of them — they will be restored from the built-in defaults the next time Xedant Agent starts:
project.yml— Project metadata (the name is auto-detected from git remote).gitignore— Default ignore patterns for the.xedant/directoryoutput.parser— Parser rules for generic script outputbuild.parser— Parser rules for build outputdeploy.parser— Parser rules for deployment outputtelegram.yml— Telegram bot configurationproviders.yml— AI provider definitions and templatesREADME.md— Format documentation for all configuration files (read by the AI model)
Configuration files (build.yml, deploy.yml, project.yml, hooks.yml, mcp.yml, skills.yml, models.yml, providers.yml, telegram.yml, tasks.yml, bots.yml, miniagent.yml) and the *.parser rule files are also automatically validated when saved. Validation results appear in the build panel next to the regular builds — errors in red, warnings in yellow — with links to the matching section in README.md, so you can look up the correct format.