Chat output validation is the first and simplest level of validation in Xedant Agent. Every action the AI takes in the chat is fully visible: what it reads, what it changes, which commands it runs, and what came out of them. Unlike the plain console version of Claude Code, where everything flows past as a stream of text, here every operation becomes its own interface element that you can expand, inspect, and check.
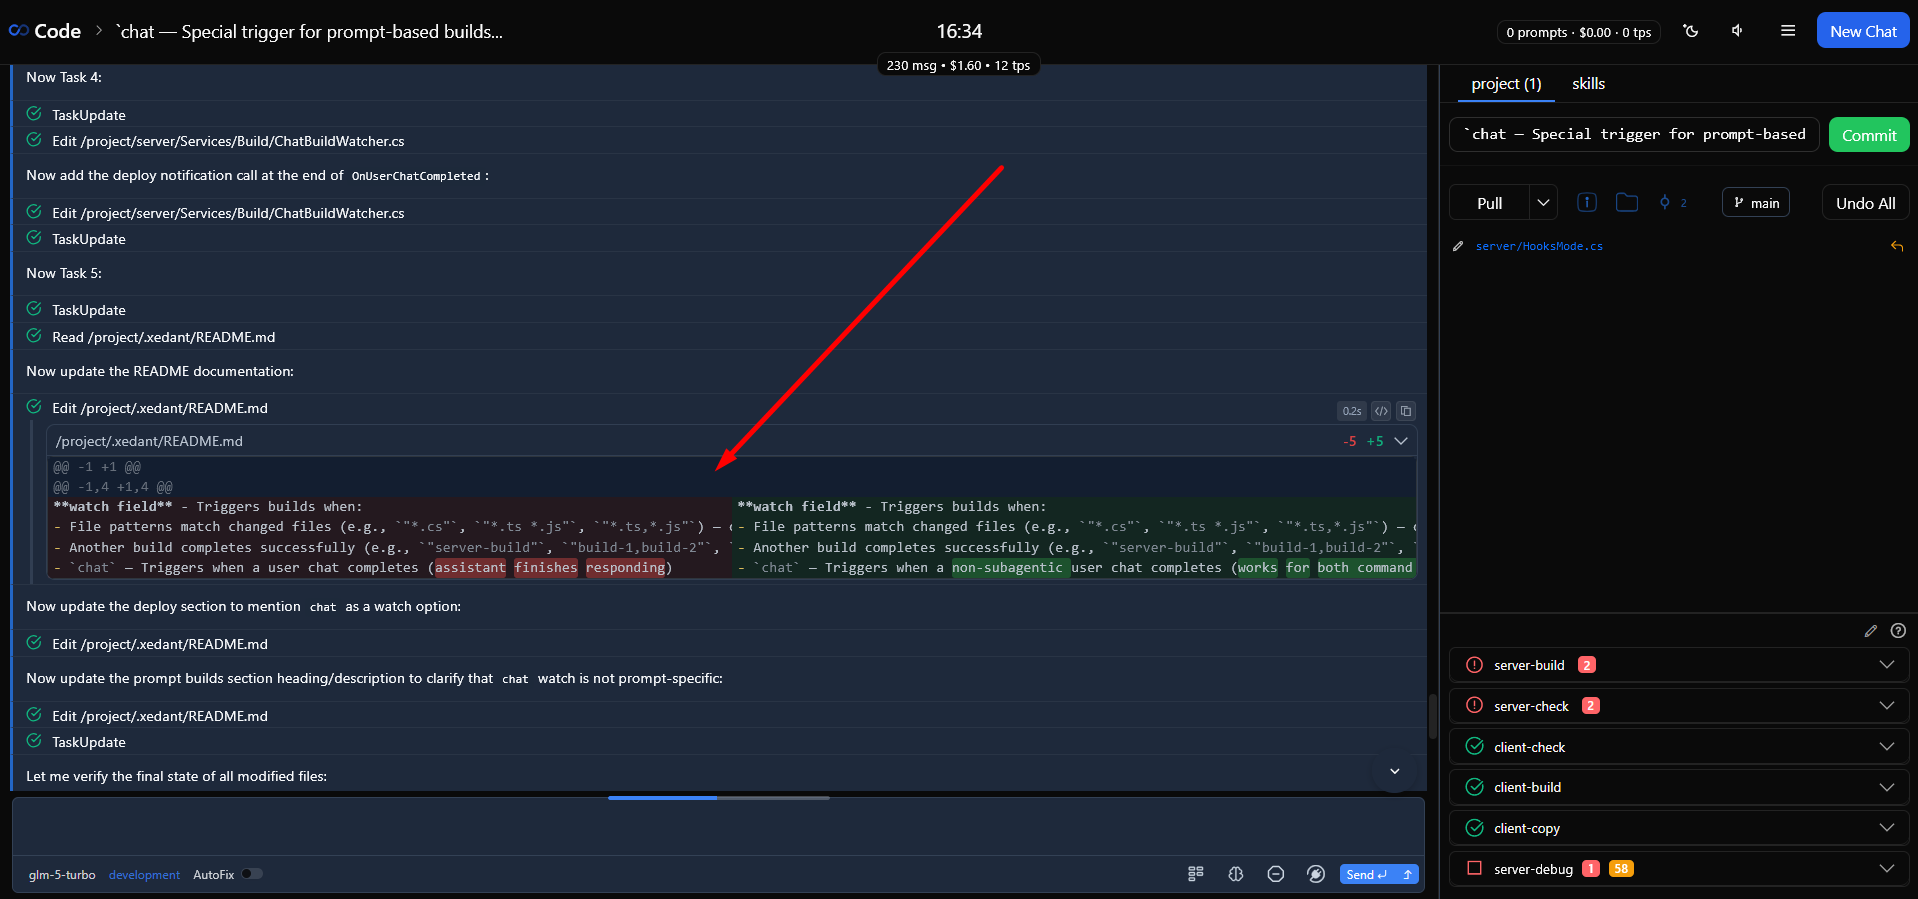
Checking the AI’s Actions
Every tool call — a file read or edit, a command run — appears in the chat as its own message. Successful reads and edits arrive collapsed by default so the conversation stays clean, but any of them expands with one click to show exactly what happened.
File Reads
When the model reads a file, the chat shows a message with the file path. Click it, and the full contents of the file open — exactly what the model received. This makes it easy to confirm that the AI is reading the right file and relying on correct data.
File Edits and Diffs
Edit messages show a before/after comparison of the file: removed lines are marked red, added lines green. Expand the comparison and check exactly what the model changed — this is how you catch unwanted or mistaken edits in time, before they pile up.
One Line per Operation
A tool call and its result are merged into a single collapsible item with a status icon: it spins while the operation is running, turns into a green checkmark on success, and into a red exclamation mark on failure. Click the message to expand the full diff or output. This compact form is handy when there are many operations and you need to skim through them quickly.
Error Messages
When a tool call fails, the message gets a red border, so failures stand out from the rest of the conversation — and a click opens the full error output. Repeated errors are not a small thing to shrug off: they mean the model is missing information it needs. Figure out what is going on, then ask the model to add it to CLAUDE.md (if it concerns project specifics) or to the current skill (if it is a general rule). It usually takes 5–10 such cycles to reach 99% accuracy, even on complex tasks.
Per-Message Statistics
Every message carries detailed usage numbers. Hover over a message to see its stats, or check the running totals in the chat header badge.
- Processing time — how long the model spent generating that message (in seconds, for example “1.2s”);
- Input tokens — the size of the request sent to the model for that step;
- Output tokens — the amount of text the model generated in reply;
- Cache read tokens — the part of the request taken from the prompt cache (cheaper and faster);
- Cost — calculated from the pricing configured in your model settings (input, output, and cache token rates). Set the correct prices there, otherwise the dollar amounts stay nominal.
Because a tool call and its result are merged into one item, the stats are shown as a single combined total — the call and its reply together.
Keep in mind: providers often report usage for several messages in a row rather than one by one (usually for assistant messages). These numbers arrive with a delay of a second or two because they are extracted from the log — expect the exact figures near the end of the chat, or about ten seconds after the message first appears.
Statistics in the Chat Header
While the model works, a small badge with live summary statistics floats under the header. Collapsed, it shows three numbers:
- Total tokens — all tokens spent in the current chat (for example “12.4k tok”);
- Total cost — the spend for the whole chat session (for example “$0.15”);
- Tokens per second — the working speed, calculated from output tokens and processing time.
When the chat runs subagents — separate child agents — the collapsed badge shows combined totals for the main chat and all subagents together. Hover it, and the breakdown opens on two lines: one for the main chat and one for the combined stats of all subagents, each with its own message count, tokens, cost, tokens per second, cache read, input, and output tokens. Without subagents, the hover view simply adds the message count and the cache read, input, and output token totals. A timer of cumulative processing time (mm:ss) is shown separately in the header bar.
When the model spawns subagents, a badge with their count appears to the left of the timer. Click it to open the list of all subagent chats with the stats of each (messages, cost, tokens per second, cache tokens). Click a subagent to switch to its chat, and use the back arrow to return to the main chat.
Message Controls
Continue from This Message
Hover over any message that is not a tool call, and a small play button appears. It continues the conversation from that exact point: everything said and done after it is removed, and the chat goes on from there. A confirmation dialog shows the cut before anything is deleted. This is handy for re-checking your work: when the model heads the wrong way, you continue from the last good message instead of starting the chat over.
Copy Message
Hover over a message and a copy button appears next to it. It puts the message content on your clipboard — useful when you want to share a specific output or paste it into another tool for a closer look.
Stop Processing
While the model is actively working, a stop button is visible in the header. Press it to cancel the current request immediately: the model receives the cancel signal and stops generating, and the chat gets a note that processing was stopped manually. Use it whenever you see the model going the wrong way — there is no point in waiting out a bad answer. Stopping and correcting the model is normal. If it stumbles over the same thing again and again, ask it to write the missing information into CLAUDE.md or the current skill — a single line pointing in the right direction saves hours and money in future sessions.
Important: stopping the main chat automatically stops all of its subagents. Subagents cannot be controlled one by one — they are fully managed by the background agents.
Message Queue
When you send messages in quick succession, they line up in a queue above the input field. Each waiting message is an editable card marked with a status icon: green while it waits its turn, orange while paused. You can:
- Edit — click the card to change the message text before it is sent;
- Pause — hold the message back until you are ready;
- Delete — remove the waiting message entirely.
The point of the queue is to write down your next thoughts without waiting for the current answer to finish. Keep typing the next correction or question while the model is still working — queued messages are sent automatically, one by one, in order. The queue also works as a buffer: its messages are always handled before AutoFix, so the automatic fixer does not jump into the chat until everything you planned has been sent.
Practical Validation Tips
- Fix the cause, not the symptom. When the model makes a mistake or cannot find what it needs, do not limit yourself to a remark in the current message. Ask it to update
CLAUDE.md(knowledge about the project) or the current skill (general rules). Even one line of correct instruction prevents the same error in all future sessions. - Reach error-free operation step by step. Repeated errors mean the model lacks context. It usually takes 5–10 iterations of adding to
CLAUDE.mdand the skills to reach 99% accuracy, even on complex tasks. The product’s author runs models for hours unattended — but only after investing dozens of iterations into the right files. It also helps to restart the chat from scratch to get a clean run, recording the errors you meet along the way inCLAUDE.mdand the skills — especially when moving to new kinds of tasks. - Look at the big picture. Expand the diffs and spot-check the results instead of reviewing every single line. The goal is to quickly notice repeating patterns of errors and fix them at the source — in
CLAUDE.mdor the skills — rather than proofreading each line by hand. - Watch the context grow. The longer the chat, the slower and more expensive each step — the model has to process the whole history. A fresh chat is often faster and cheaper than continuing an overgrown one, even counting the effort of restoring the context.
- Watch for suspiciously high costs. A sudden jump in cost per step usually means a low cache hit rate — the model reprocesses most of the request from scratch instead of using cheap cached tokens. Often this points to a problem on the client or provider side. If it drags on, the provider may take measures. Stop, study the analytics, compare with previous periods, and report your findings to the provider — the cause may be on their side.
- Prefer a new chat over continuing from an old message. When the model has gone off track, a fresh chat usually beats “continue from message”: it starts with a clean, focused context and costs less per step than dragging along the baggage of an overgrown conversation. Repeated “fix it” rounds in one chat are wasteful — a new chat more often produces an instant solution, while the old one loops through the same errors.
- Stop bad answers early. If the header stats show the model processing for a long time and generating many tokens, check what it is doing, and stop it if it is piling up unnecessary content or wandering off. Models sometimes get stuck in self-analysis loops, and a hint does not always break them out. Most often the fastest way out is to start over.
For a wider look at performance, see Analytics & Observability. For keeping the context size under control, see Context Utilization — and for the complete chat feature reference, the Chat page.
Learn from Hard Chats
After a particularly painful error, or a task that took hundreds of messages, always ask the model to draw the lesson: update CLAUDE.md, create or improve a skill, and record the missing context that caused the struggle. That is your guarantee the same pain will not repeat. Skip this step, and the same problem will almost certainly come back soon: the model will repeat its mistakes, and you will burn the same messages again. A few minutes spent writing the lesson down save hours in future sessions.
Sound Feedback
Xedant Agent plays a distinct sound for each type of event, so you can run long tasks without watching the screen:
- Message — on every incoming message, confirming that the model is still working;
- Complete — when the chat finishes processing;
- Notification — when the chat is waiting for your decision or approval (for example, a question from the model);
- Error — when the chat hits a failure.
Every sound type has its own volume, adjusted in Settings → Sound; the speaker icon in the header mutes everything at once. You can also replace any built-in sound: put an MP3 file with the same name into the .xedant/sounds/ folder of your project — for example, message.mp3, complete.mp3, error.mp3. The server serves your files first and falls back to the built-in ones only where no custom file exists. In time you start to feel the workflow by ear: a steady rhythm of message pings means all is well, while a sudden silence, a notification, or an error sound means it is time to look at the screen. The author uses Bluetooth headphones and walks away from the computer during tasks — with a good adapter you can move around the house without being tied to your desk. For detailed setup and the full sound catalog, see Sound Feedback Validation.